
티스토리 뷰
저번글에서는 vue.js와 Express로 프론트엔드와 백엔드 간의 통신 방법을 다뤄보았습니다.
[PWA] Vue.js + Express + MySQL 연동 1
1. 프로젝트 생성 비쥬얼스튜디오 코드 실행 새 터미널 창을 열어 폴더를 생성합니다. 여기서는 프로젝트 폴더명을 movie 폴더로 하겠습니다. mkdir 프로젝트폴더명 생성한 폴더로 경로 이동을 하
marshmello.tistory.com
이번 글에서는 Express에 MySQL 연동하여 회원가입과 로그인을 하는 프로젝트를 만들어 보겠습니다.
우선 mysql을 설치합니다. 설치 방법은 아래의 링크로 가면 자세히 설명되어있습니다.
marshmello.tistory.com/5?category=971973
01.MySQL 설치 및 설정
01. MySQL 설치 및 설정 1.1 MySQL 다운로드 https://www.mysql.com/downloads/ 를 방문하여 상단메뉴 중 Community를 클릭합니다. MySQL Community Server 메뉴를 눌러 다운로드 페이지로 이동합니다. Go to Dow..
marshmello.tistory.com
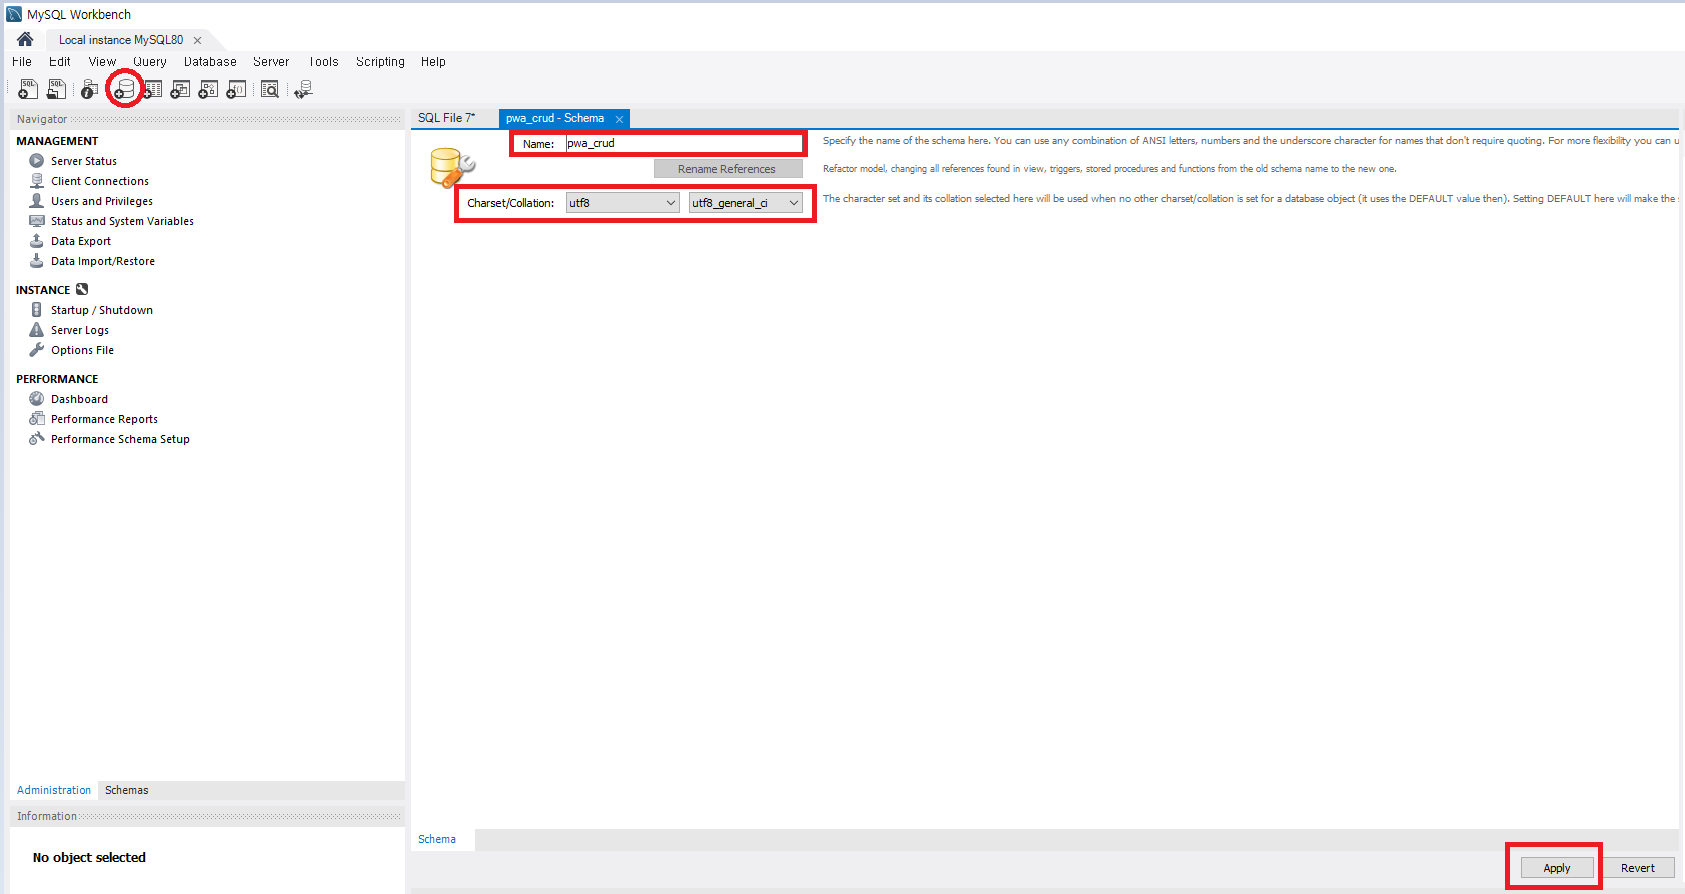
mysql workbench를 열어 스키마 추가 버튼 클릭 -> 스키마명 작성
Charset을 utf8 , utf8_general_ci 선택 후 Apply 버튼 클릭

다음창에 Apply버튼 클릭 -> Finish버튼 클릭을 하면 스키마가 생성된것을 알 수 있습니다.
새 스크립트창 버튼 클릭 후 아래의 SQL 코드를 실행합니다.
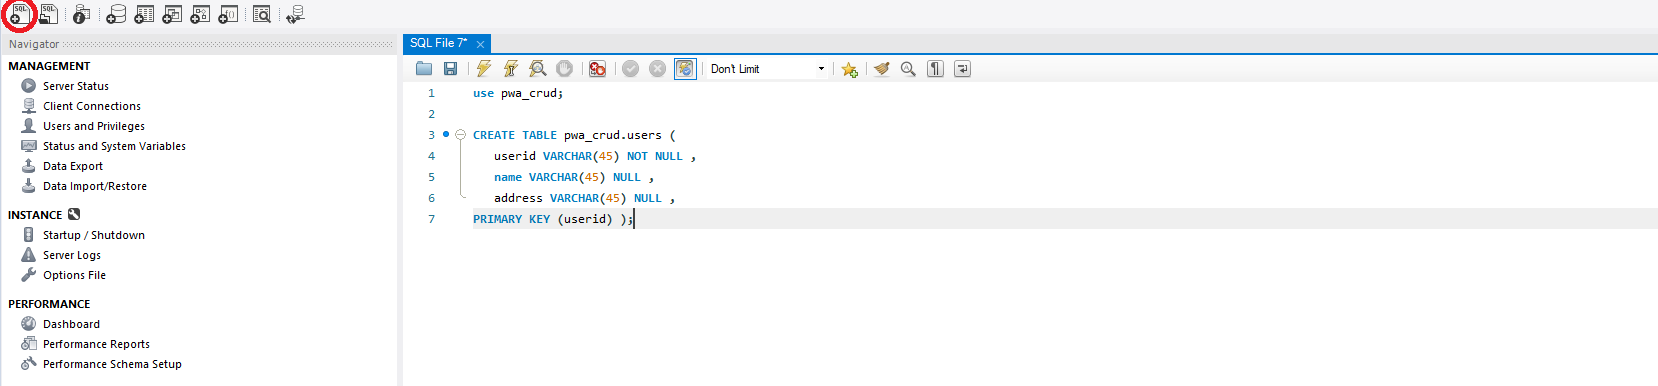
use pwa_crud;
CREATE TABLE users (
   userid VARCHAR(255) NOT NULL ,
   password VARCHAR(255) NULL ,
   name VARCHAR(255) NULL ,
PRIMARY KEY (userid) );
1. 프로젝트 생성
비주얼스튜디오 코드를 열어 터미널창에 프로젝트 폴더를 생성합니다. 여기서는 프로젝트 폴더명을 admin 폴더로 하겠습니다.
mkdir 프로젝트폴더명
생성한 폴더로 경로 이동을 하여, 개발 환경 세팅을 합니다.
cd admin
npm install -g yarn
npm install -g @vue/cli
프로젝트 생성
vue create frontend // frontend 폴더 생성
서버실행
cd frontend
npm run serve //서버 실행
localhost:8080 을 익스플로러에 실행하면 vue.js 화면이 뜨면 정상적으로 생성된 것으로 확인할 수 있습니다.
다시 최상위 폴더 admin 으로 이동 후 express 프레임워크를 설치합니다.
cd ../
npm install -g express-generator
express --view=pug backend // backend 폴더 생성
서버 실행
cd backend
npm install
SET DEBUG=backend:*
npm start // 서버 실행
익스플로러를 열어 localhost:3000 으로 접속하면 아래와 같은 화면을 확인할 수 있습니다.

Ctrl+C를 눌러 서버를 중지합니다. Y
frontend 폴더로 이동하여, vue.config.js를 생성한 뒤 아래와 같이 입력합니다.
module.exports = {
    devServer: { //① api 요청이 있을때 어디에서 처리할지를 설정
      proxy: {
        '/api': {
          target: 'http://localhost:3000/api',
          changeOrigin: true,
          pathRewrite: {
            '^/api': ''
          }
        }
      }
    },
    outputDir: '../backend/public',  //② 배포 파일의 위치를 지정
  }
frontend 폴더에서 npm run build를 실행합니다.
cd frontend
npm run build
그리고 나서 Express 서버를 실행시키면, localhost:3000의 페이지도 프론트엔드쪽과 동일하게 변경된 것을 확인할 수 있습니다.
cd ../backend
npm start
백엔드에 mysql, bycrypt 암호화 모듈을 설치합니다.
npm install mysql --save
npm install bcryptjs --save 
설치 후 backend/app.js에 다음 내용을 추가합니다. connection 객체는 설치한 DB 환경에 맞는 값으로 변경해줍니다.
var mysql = require('mysql');
// Connection 객체 생성
var connection = mysql.createConnection({
  host: 'localhost',
  port: 3306,
  user: 'root',
  password: 'password',
  database: 'pwa_crud'
});
// Connect
connection.connect(function (err) {
  if (err) {
    console.error('mysql connection error');
    console.error(err);
    throw err;
  }
});
npm start로 서버를 다시 실행하고, 데이터를 입력해봅니다.
npm start
만약, 실행 후 아래와 같은 에러가뜬다면 다음과 같이 처리합니다.
Error: ER_NOT_SUPPORTED_AUTH_MODE: Client does not support authentication protocol requested by server; consider upgrading MySQL client

mysql installer.exe 실행

MySQL Server의 Reconfigure 버튼 클릭
Next-> Next-> Authentication Method 영역에서 Use Legacy Authentication Method 선택 후 Next 버튼 클릭
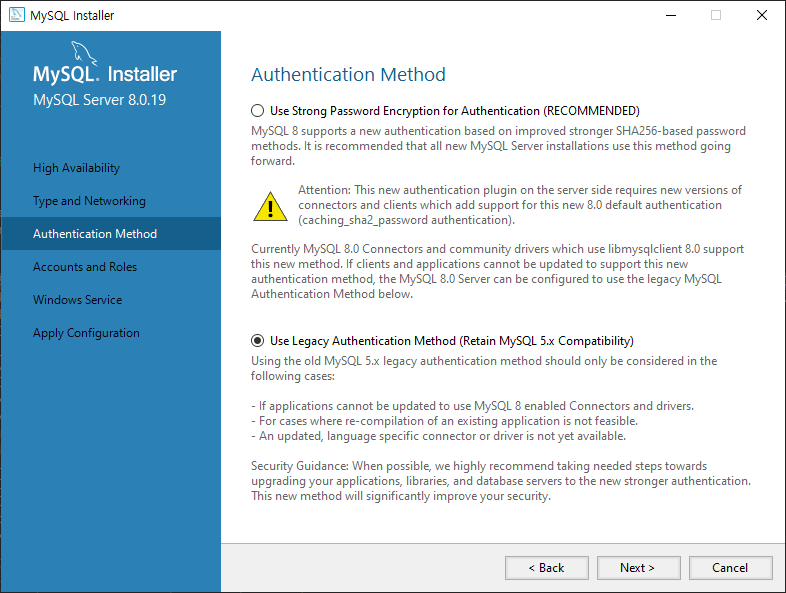
현재 Root 비밀번호 입력 후 check버튼 클릭 후 Next 버튼 클릭 ->Next ->Execute 버튼클릭

모든 과정에 문제가 없다면, 에러코드가 출력되지 않는 것을 확인할 수 있습니다.
API 통신을 위해 frontend,backend 경로로 가서 npm install axios --save 명령을 실행하여, axios 패키지를 설치합니다.
cd frontend
npm install axios --save
cd ../backend
npm install axios --save
설치 완료 후 frontend/src/main.js를 다음을 추가합니다.
import axios from 'axios'

Vue.prototype.$http = axios;
frontend/src/components/하위에 SignUp.vue를 생성합니다.
<template>
  <div class="app">
    <div class="input_row">
      <label for="id">아이디</label>
      <input type="text" id="id" v-model="user.userid" />
    </div>
    <div class="input_row">
      <label for="name">이름</label>
      <input type="text" id="name" v-model="user.name" />
    </div>
    <div class="input_row">
      <label for="password">비밀번호</label>
      <input type="password" id="password" v-model="user.password" />
    </div>
    <button :click="signUp">가입하기</button>
  </div>
</template>
<script>
export default {
 methods: {
    signUp: function (event) {
      this.$http.post("/api/users/signUp", {
          user: this.user,
        })
        .then((res) => {
          if (res.data.success == true) {
            alert(res.data.message);
            this.$router.push("/login");
          }
          if (res.data.success == false) {
            alert(res.data.message);
          }
        })
        .catch(function (error) {
          alert("error");
        });
    }
  },
  data() {
    return {
      user: {
        userid: "",
        name: "",
        password: "",
      },
    }
  }
}
</script>
frontend/src/components/하위에 Login.vue를 생성합니다.
<template>
  <div class="hello">
    <div class="input_row">
      <label for="id">아이디</label>
      <input type="text" id="id" v-model="user.userid" />
    </div>
    <div class="input_row">
      <label for="password">비밀번호</label>
      <input type="password" id="password" v-model="user.password" />
    </div>
    <button v-on:click="login">로그인</button>
    <a href="/signUp">가입하기</a>
  </div>
</template>

<script>
export default {
  data: function () {
    return {
      user: {
        userid: "",
        password: "",
      }
    }
  },
  methods: {
    login: function (event) {
      this.$http
        .post("/api/users/login", {
          user: this.user,
        })
        .then(
          (res) => {
            //로그인 성공
            alert(res.data.message);
          },
          (err) => {
            // error 를 보여줌
            alert("Login failed! please check your id or password");
          }
        )
        .catch((err) => {
          alert(err);
        });
    }
  }
};
</script>
rontend/src/components/하위에 UserList.vue를 생성합니다.
<template>
  <div class="hello">
    <div v-for="(user, index) in users" :key="index" class="user-wrap">
      <h2>No. {{ index + 1 }}</h2>
      <dl>
        <dt>아이디</dt>
        <dd>{{ user.userid }}</dd>
        <dt>이름</dt>
        <dd>{{ user.name }}</dd>
      </dl>
    </div>
  </div>
</template>

<script>
export default {
  data() {
    return {
      users: [],
    }
  },
  created() {
    this.$http.get("/api/users").then((response) => {
      this.users = response.data;
    });
  }
};
</script>
backend/routers/users.js파일을 아래와 같이 수정합니다.
var express = require('express');
var router = express.Router();
const bcrypt = require('bcryptjs');

//추가한 부분
var mysql = require('mysql');
// Connection 객체 생성
var connection = mysql.createConnection({
  host: 'localhost',
  port: 3306,
  user: 'root',
  password: 'rootroot',
  database: 'pwa_crud'
});
// Connect
connection.connect(function (err) {
  if (err) {
    console.error('mysql connection error');
    console.error(err);
    throw err;
  }
});

router.get('/', function (req, res) {
  connection.query('SELECT * FROM users', function (err, rows) {
    if (err) throw err;
    res.send(rows);
  });
});
router.post('/signUp', function (req, res) {
  const user = {
    'userid': req.body.user.userid,
    'name': req.body.user.name,
    'password': req.body.user.password
  };
  connection.query('SELECT userid FROM users WHERE userid = "' + user.userid + '"', function (err, row) {
    if (row[0] == undefined){ //  동일한 아이디가 없을경우,
      const salt = bcrypt.genSaltSync();
      const encryptedPassword = bcrypt.hashSync(user.password, salt);
      connection.query('INSERT INTO users (userid,name,password) VALUES ("' + user.userid + '","' + user.name + '","' + encryptedPassword + '")', user, function (err, row2) {
        if (err) throw err;
      });
      res.json({
        success: true,
        message: 'Sing Up Success!'
      })
    }
    else {
      res.json({
        success: false,
        message: 'Sign Up Failed Please use anoter ID'
      })
    }
  });

});
router.post('/login', function (req, res) {
  const user = {
    'userid': req.body.user.userid,
    'password': req.body.user.password
  };
  connection.query('SELECT userid, password FROM users WHERE userid = "' + user.userid + '"', function (err, row) {
    if (err) {
      res.json({ // 매칭되는 아이디 없을 경우
        success: false,
        message: 'Login failed please check your id or password!'
      })
    }
    if (row[0] !== undefined && row[0].userid === user.userid) {
      bcrypt.compare(user.password, row[0].password, function (err, res2) {
        if (res2) {
          res.json({ // 로그인 성공
            success: true,
            message: 'Login successful!'
          })
        }
        else {
          res.json({ // 매칭되는 아이디는 있으나, 비밀번호가 틀린 경우            success: false,
            message: 'Login failed please check your id or password!'
          })
        }
      })
    }
  })
});
module.exports = router;
이제 라우터를 설정합니다.
backend/app.js에는 아래의 내용을 추가합니다.
var usersRouter = require('./routes/users');
...
app.use('/api/users', usersRouter);
frontend/src/routers/index.js 열어 아래와 같이 입력합니다.
import Vue from 'vue'
import VueRouter from 'vue-router'
import Index from '@/components/UserList'
import Login from '@/components/Login'
import SignUp from '@/components/SignUp'

Vue.use(VueRouter)

const routes = [
  {
    path: '/',
    name: 'index',
    component: Index
  },
  {
    path: '/login',
    name: 'login',
    component: Login
  },
  {
    path: '/signUp',
    name: 'signUp',
    component: SignUp
  }
]

const router = new VueRouter({
  routes
})

export default router
라우터를 설정했으므로, frontend/src/app.vue를 열어 아래와 같이 수정합니다.
<template>
  <div id="app">
    <div id="nav">
      <router-link to="/">Home</router-link> |
      <router-link to="/login">Login</router-link>
      <router-link to="/signUp">SignUp</router-link>
    </div>
    <router-view/>
  </div>
</template>
빌드 후 실행해 봅니다.
cd ..\frontend\
npm run build
cd ..\backend\
npm start
http://localhost:3000/ 브라우저를 열어 실행해보면 아래와 같이 실행되면 연동이 완료된 것을 확인 할 수 있습니다.
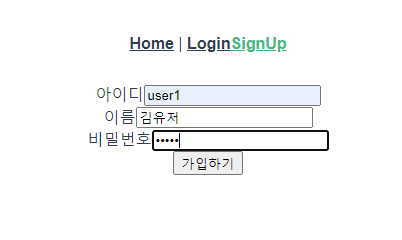
Signup 메뉴로 가서 값 입력 후 가입하기를 클릭합니다.
Home으로 돌아오면 사용자 리스트에 가입한 사용자 정보가 있는 것을 확인 할 수 있습니다.

수고하셨습니다.!
'WEB' 카테고리의 다른 글
| Keycloak 시작하기 1 (0) | 2025.01.21 |
|---|---|
| vis.js 네트워크 라이브러리 및 샘플코드 다운로드 (0) | 2024.09.27 |
| [PWA] Vue.js + Express + MySQL 연동 1 (10) | 2021.01.05 |
| kboard default 테마 디자인 수정 (0) | 2020.12.29 |
| 한국전자인증 도메인 연결 방법 (0) | 2020.12.22 |
- Total
- Today
- Yesterday